TireSwap VR
TireSwapVR
A hands-on VR training simulator for the complete tire change procedure — enforcing correct step order through interaction locks, animating the tire changer machine, and delivering multi-sensory feedback at each stage.

Why this exists
Vocational training at scale is expensive and scarce
70K
New automotive technician positions open annually in the US through 2034, with 56,000+ dealership roles currently unfilled.
$28K
Maximum cost for a student to complete a physical automotive training program — equipment and lab access are major barriers.
275%
More confident applying skills after VR training versus traditional methods, according to vocational training studies.
Structure
Two scenes — practice first, then perform
Scene 01 — Lobby
Tool familiarization
Three sequential tasks: place 4 tires onto the storage rack, apply the torque wrench to a practice nut, then press the door button. Each task is locked until the previous is complete.
Scene 02 — Simulation
Full tire change on vehicle
Complete the 9-step procedure on the vehicle, including operating the tire changer machine and balancer. Repeat for remaining wheels.
Simulation Workflow
9 steps, enforced by interaction locks
The tire changer handles steps 04–05 via an internal state machine. Bolts cannot be grabbed before the lift completes; the tire cannot be grabbed before all 5 bolts are removed.
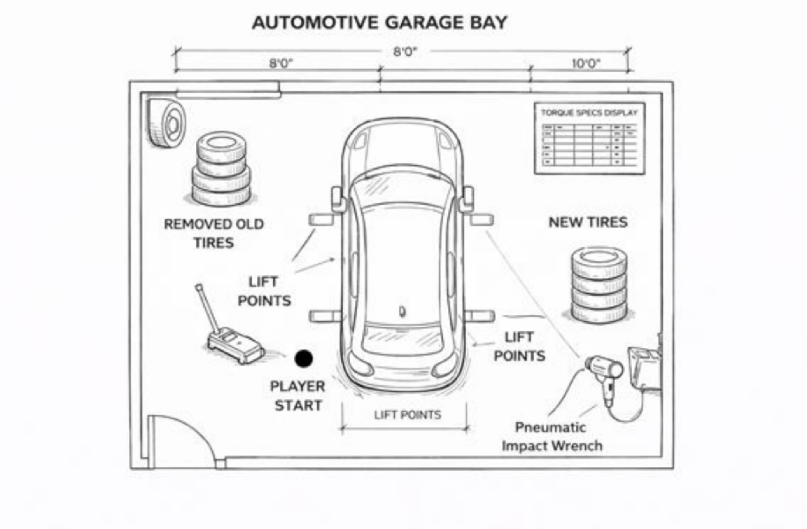
Space Design
Garage bay layout
Designated zones for removed tires, new tires, lift points, and tools — spatial layout reinforces procedural habit. The player start position, torque specs display, and pneumatic wrench are all positioned to match a real shop workflow.
Design Decisions
Why the system is built the way it is
Decision 01
Enforce procedure through locks — not warnings
Bolts are assigned to a LockedNut interaction layer by default. The tire's grab component stays disabled until all 5 bolts are removed. The door button to the simulation is inert until lobby tasks complete. Correct sequence is the only possible sequence — not just the recommended one.
Decision 02
Two-scene structure — isolate skills before integrating them
The Lobby teaches tool handling in isolation: place tires on a rack, apply the torque wrench to a single nut, press the door button. Only then does the simulation open. Cognitive load theory shows novices learn better when sub-skills are separated before integration.
Decision 03
Multi-sensory feedback — confirm state without breaking immersion
Every task completion triggers three simultaneous channels: a strong short haptic pulse (versus a continuous low buzz while working), a one-shot success audio cue, and a visual material or geometry state change. Learners feel task completion the same way real technicians do — tactilely.
Decision 04
Guided attention — light and UI together
TrainingSequenceManager activates a UI panel and a physical scene light group simultaneously for each step. The light highlights the relevant object spatially; the panel explains what to do. Pointing before explaining — the same thing a real instructor would do.
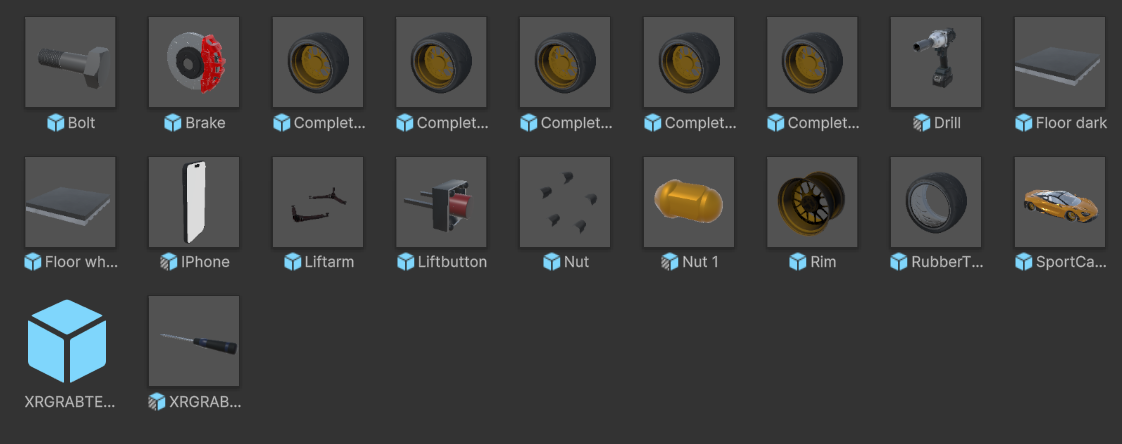
Asset Library
Custom prefabs for each interaction
Each object — tires, rims, bolts, wrenches, lift arm, and the in-world phone UI — is individually configured with XRI grab logic, interaction layers, and snapping constraints.
Tech Stack
What it's built with
Reflection
What worked and what I'd push further
What worked
The simulation delivers a complete, end-to-end tire change with correct step enforcement. The interaction lock system makes procedural discipline feel natural rather than punishing — and the tire changer state machine kept animation and logic precisely synchronized via Animator events rather than coroutine timers.
What I'd push further
More realistic tool resistance, torque accuracy feedback, proper error states with recovery flows, and vehicle variation — different makes, wheel sizes, damage conditions. The current version trains the procedure; the next version would train judgment.